
Summary
This project re-creates a video game controller using a flex sensor, and “jump” sensor, in this case a tilt sensor. An Arduino processes these inputs and establishes LEFT, RIGHT, and JUMP command signals into a Raspberry Pi-based video game emulator. The commands are send through the GPIO pins on the Raspberry Pi, leveraging a ‘Virtual Keyboard’ project. The keyboard-like signals can control the video game emulation system – RetroPi.
Also seen here:
@MocoMakers demo a glove controller4 #SNES! #Squee!! #MOSF #EscapeVelocity #EV2017 #Classic #VideoGames #DC #Evwnt #Convention pic.twitter.com/0Gvjr4sFbR
— Museum of Sci-Fi (@Museum_SciFi) September 2, 2017
Materials:
1 x Flex Sensors (project could be configured for more than one hand or more than one finger) –
https://www.sparkfun.com/products/8606
1 x Tilt Sensor – https://www.sparkfun.com/products/10289
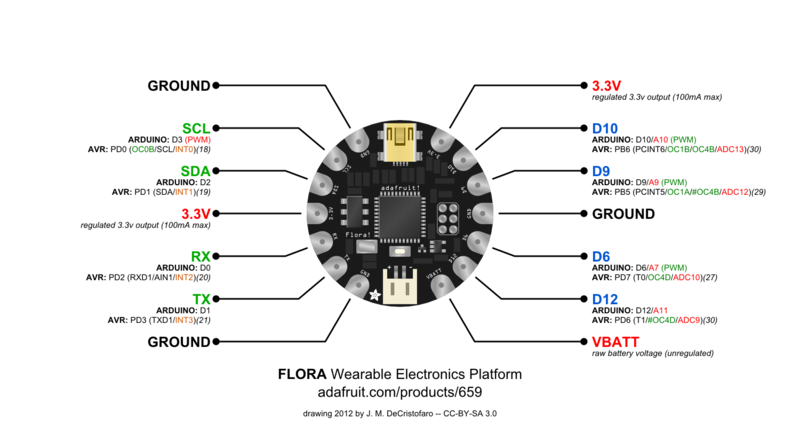
1 x Arduino Flora – Other Arduinos okay – https://www.adafruit.com/product/659
1 x Breadboard
Wires – Male to Male, Female to Male, long, and alligator clips are useful
Tape – to secure the wires
Here is some useful background on the flex sensor:
https://learn.sparkfun.com/tutorials/flex-sensor-hookup-guide
Build Guide
If you’ve never worked with a Flora before, then it needs to be set up as an available board in your Arduino IDE.
Install Flora as a supported board in Arduino IDE:
https://learn.adafruit.com/adafruit-arduino-ide-setup/arduino-1-dot-6-x-ide
Configure the flex sensor and tilt sensor as seen here:
![]()
Install the Arduino code here:
https://github.com/MocoMakers/Game-Glove/blob/master/gameglove.ino
Note that the resistor used must be calibrated in the code. In our case we used 3.3K Ohm. More on that here and here.
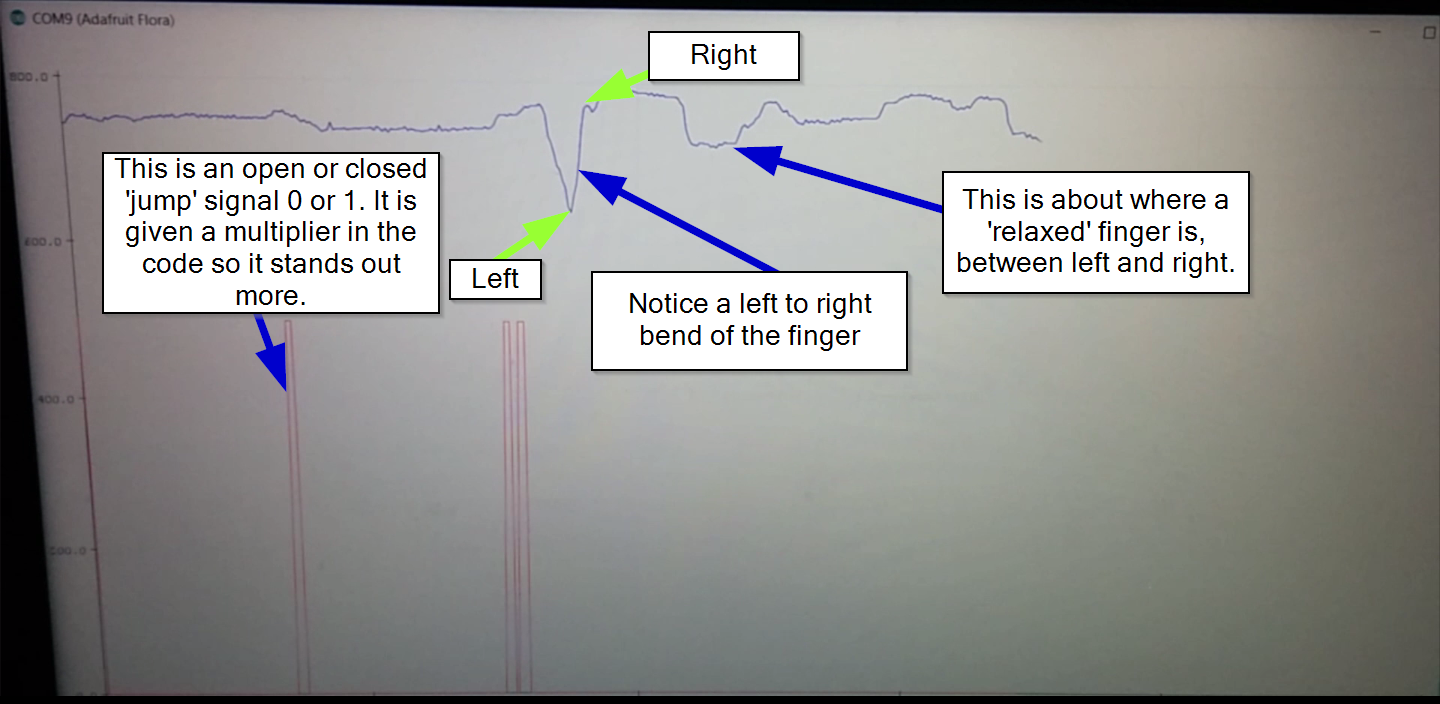
Use the Arduino IDE’s Serial Monitor and Serial Plotter to see that you are getting values from both sensors:
Installing the Virtual Keyboard for Retro Pi:
This project has the relevant install instructions on these two pages:
https://learn.adafruit.com/retro-gaming-with-raspberry-pi/adding-controls-software
and here:
https://learn.adafruit.com/retro-gaming-with-raspberry-pi/configuring-retrogame
Take note that instead of their configuration file, we are using our own code:
https://github.com/MocoMakers/Game-Glove/blob/master/retrogame.cfg
A good game video to test this on is Super Star Wars: Return of the Jedi Video games are Emulated on a Raspberry Pi, using the Retro Pi project. You will need to have the ROM installed before hand (it should have one of these file extensions).
Follow these set up instructions to install Retro Pi on a Raspberry Pi:
https://github.com/retropie/retropie-setup/wiki/First-Installation
Note that by default the Keyboard will be set up for the UK, not the USA or elsewhere. See here on how to change that:
https://retropie.org.uk/forum/topic/3495/remapping-keyboard-to-us-on-retropie-4-0/5
Once you have your video game running, test that the GPIO pins are acting as controls. A quick way to do this is to take a wire and ‘ground’ the pins that are the controls. That means connect ground pin of the Raspberry Pi to the relevant GPIO pin.
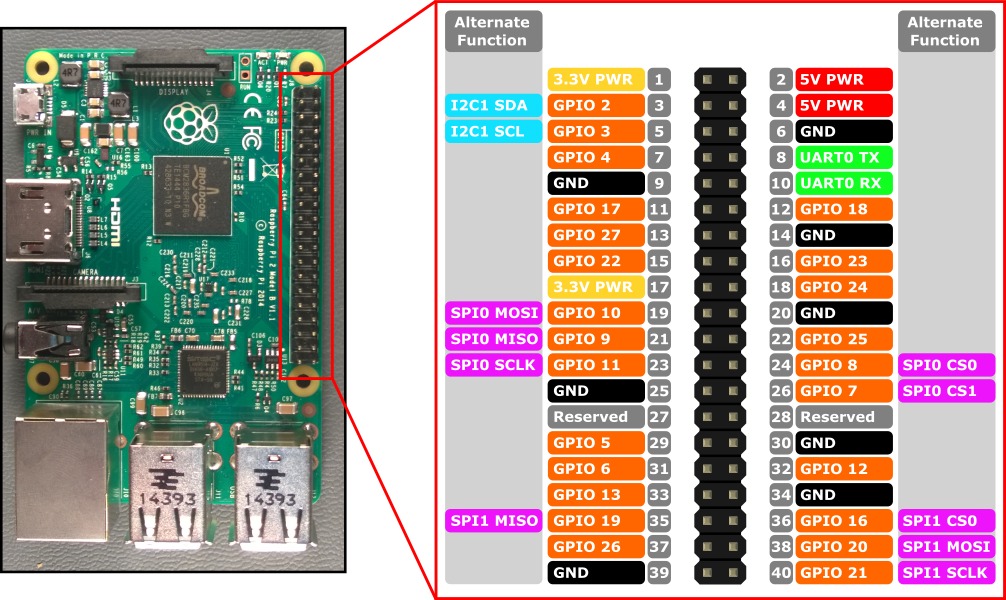 If you are able to control the console through the GPIO pins, then complete the assembly:
![]()
The pin assignments we are using are:
LEFT Control
Flora D2 –> Raspberry Pi GPIO 4
RIGHT Control
Flora D0 –> Raspberry Pi GPIO 16
Y Button (Jump)
Flora D1–> Raspberry Pi GPIO 1
Calibrating the Game Glove
Each person’s hand is shaped differently. Our controls are set up to be controlled by one finger bending, and a wrist jerk motion to trigger the jump. In our design, you wore a glove and put your hand out like you where going to shake hands. When the finger was ‘relaxed’ it has a default bend to it, may 15 degrees from straight. This amount of bend should be straight, having a straight finger would trigger RIGHT signals, and bending the finger left (60-90 degrees) would trigger LEFT signals – assuming a right-handed glove set-up.
We took a standard cloth glove, and cut a few slits along the finger. We lightly threaded the flex sensor through the slits, and secured it to the glove at the bottom. This allowed the sensor to slide a bit as the finger bends. We attached the tilt sensor to the glove as well, however we put it too close to the ‘control finger’. What happened was people would bend the finger quickly, and this would accidentally trigger the jump sensor, which should be triggered by a more violent wrist jerking motion. Putting the tilt sensor further from the knuckle that gets bent/where the cloth deforms a lot, should help.
Use Arduino’s Serial Plotter and Serial Monitor to find the Far Right flex sensor readings, and Far Left flex sensor readings, as were as where the middle is – for your reference.
You want to find a trigger threshold for the left and right where a player can ‘get to left and get to right’ without much effort (not too extreme of a finger bend), but avoid triggering too early, since the middle region should be indicative of ‘straight’, at least in the racing game we are using. When you find the right values, change them in the Arduino code file:
LEFT_FLEX_THRESHOLD = 730; \\ Initially 730
RIGHT_FLEX_THRESHOLD = 775; \\ Initially 775
Good luck, and may the force be with you (electric or midi-chlorian, your pick)!
Wilton
I have an idea that your expirement has futher inspired id like to speak with desighners personally im an artist lease give me a call